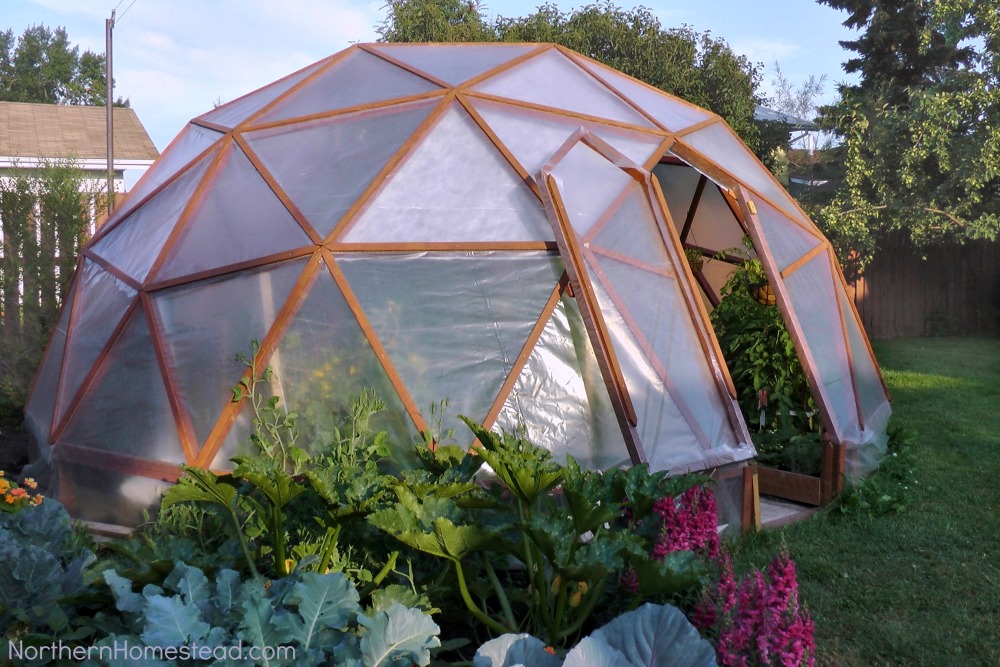
Sturdy Easy to Set Up Geo Dome Snow

Update: Here we share how to build a GeoDome greenhouse. It is our building experience for anyone who wants to build a Geodesic Dome. Check also out how to build a geodesic dome greenhouse version 2.
Why a GeoDome /Geodesic Dome Greenhouse
When it comes to gardening in colder climates, a greenhouse is almost a must-have. Because a greenhouse extends the growing season and gives the plants a lot more heat. With a greenhouse, we can actually pick ripe tomatoes here and grow some plants that we would not be able to without one. A greenhouse can also be a great place to hang out on those cool spring days and summer nights.
When we started to look out for one to build, our expectations were very high. In a northern garden, we have to deal with frost, nasty winds and hail, and also loads of snow in the winter. Our days in spring and fall don't have much direct sunlight, so we need to catch every sunbeam we can. Plus, we live in town, and the greenhouse in our small backyard needed to be somehow catchy. In our research we came across the GeoDome greenhouse:
- Very unique, lightweight structure
- Stable in wind and under snow
- Optimal light absorption
- Has the most growing ground space
- A unique hang-out place
- An eye catcher
The GeoDome greenhouse seemed to be just what we were looking for. Since there is no foundation and this structure can be portable or temporary, we did not need any permits and would be able to take it with us if we would move. So it's all good! But … How does a person build a GeoDome greenhouse?
What materials to use? What plan to go by? Which tools are needed? How to do the cutting? How to assemble the GeoDome? By what method to cover the GeoDome?
We looked at dozens of how-to instructions and even bought a pricey e-Book (with very little value). But all together it helped us build the GeoDome we have and love.
Materials needed to build the GeoDome greenhouse
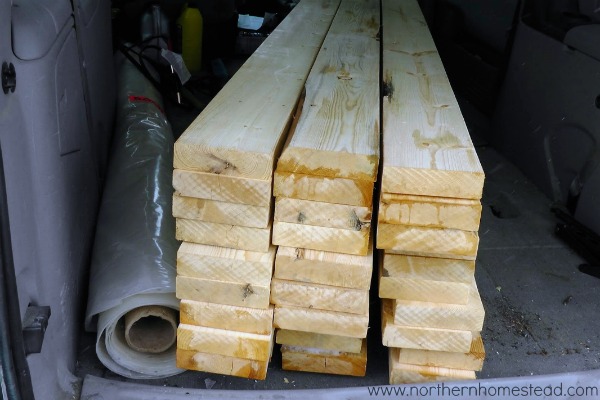
-Wood. We used untreated spruce lumber and stained it before assembling it. You could also use Douglas Fir which is more durable.
– Screws, about a pound
– Covering. We used greenhouse plastic that was given to us from a commercial greenhouse. Plastic from a commercial greenhouse can be easily reused on a dome, since there is not so much pressure on it, and it can last another 3-5 years. You can also cover the dome with greenhouse film, shrink film, or polycarbonate panels.
– Automatic window openers and hinges for the door and the windows.
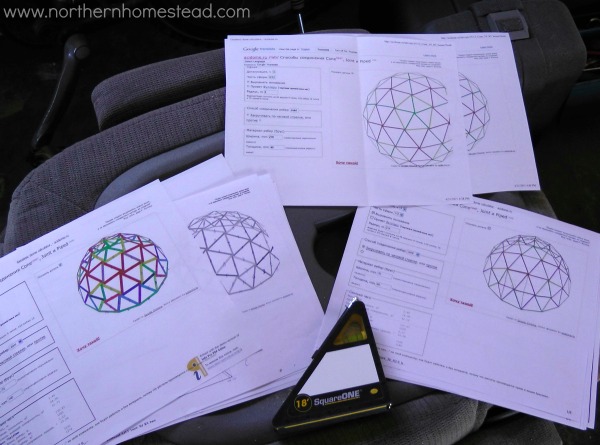
GeoDome Greenhouse plans
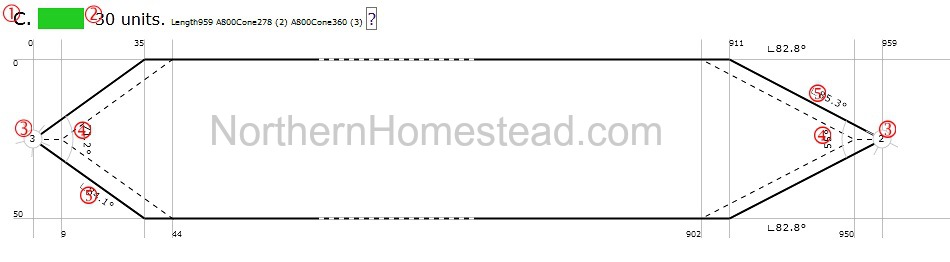
Acidome is one of the best GeoDome calculators we were able to find on the internet. Choose your language at the top of the page. The Geodesic frequency for a Dome can be 2V, 3V, 4V. A smaller dome can have a lower frequency; for our 18′ dome we chose the 3V frequency. Anything bigger than 18′ should be 4V. Keep also in mind that whatever the width of the dome is, it will be half that in height. For example, our 18′ dome is 9′ high plus the 1′ pony wall.
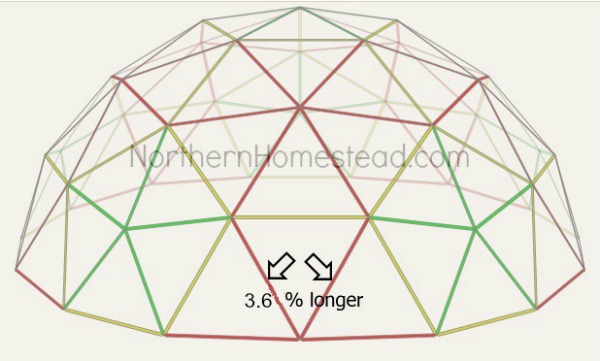
The challenge with a 3V Dome is that the red struts at the bottom of the dome, as shown above, are 3.6 % longer than all other red struts. Most plans on the internet do not do this little adjustment and end up with an uneven bottom. Sure, it is possible to level the foundation, but much easier to adjust the length of the 10 red struts on the bottom, always in between the pentagons.
Why did we go with 3V even though it is the more complicated version? We had a spot for an 18′ dome. To have that size in 2V would make the triangles too big and too small with 4V. If you want to avoid the problem of leveling in a 3V dome and have the space, go with a bigger size in 4V frequency!
Once we had the plan, we printed it out in color so it was helpful on the job site.
Tools needed to build the GeoDome greenhouse
– measuring tape
– square
– pencil
– level
– utility knife
– safety glasses
– hearing protection
– drill
–dual bevel miter saw or radial arm saw
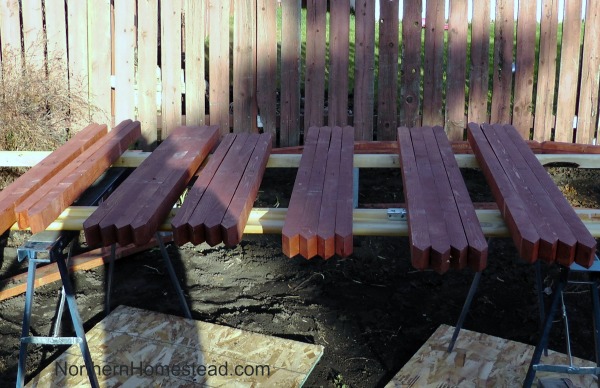
Cutting the struts
Firstly we ripped the 2×6 to 2″ wide boards. Your lumber store might be willing to do this for you. For cutting the joints a radial arm saw is preferred because it can make very precise cuts. We used a dual bevel miter saw and it also did a good job – precision is key when making those angle cuts. And because precision is important to us we went with the metric system. Here's the link for our dome size: Acidome.com
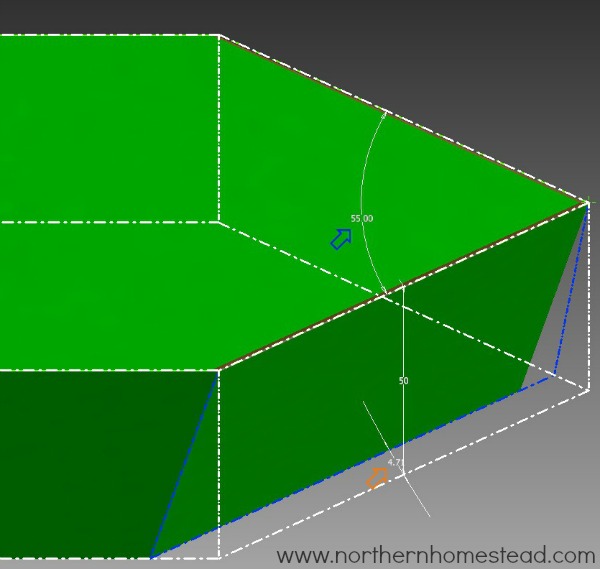
How to use the Acidome.com calculator?
- Alphabetic index of the struts
- Number of struts of this type
- The numeric designation size vertex to which this edge rests on this end
- The value of a flat angle to the plane of the outer edge
- The value of the dihedral angle between the outer plane of the edge and the plane of the cut
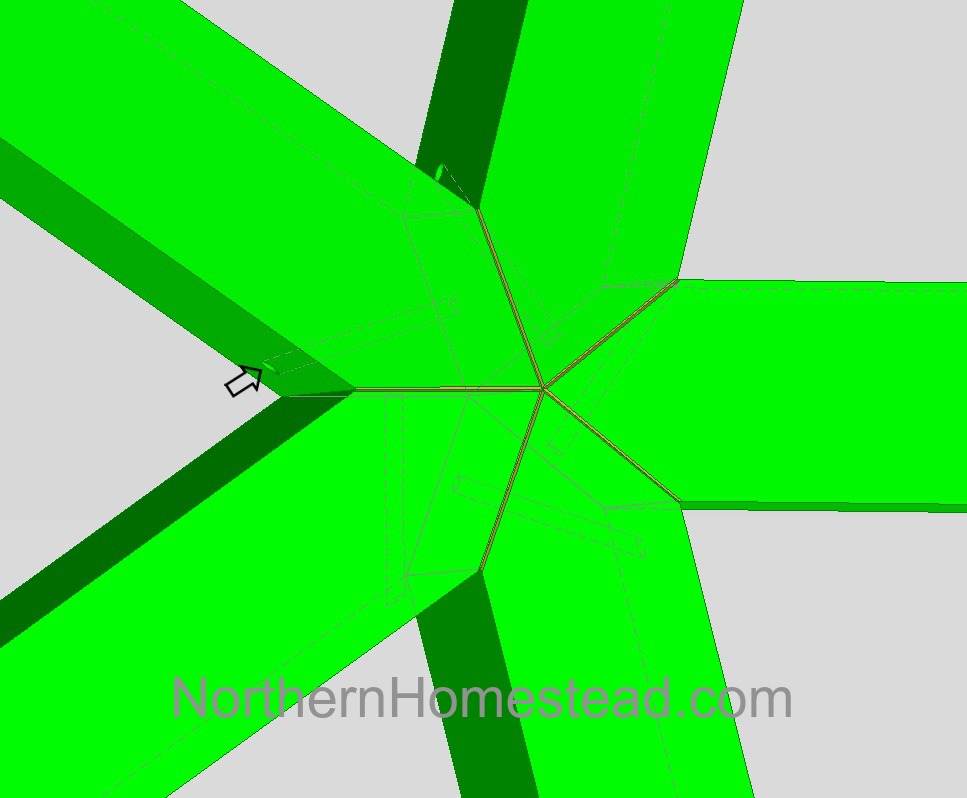
Here's a graphic of the end of a strut in 3D.
Finished struts ready to be put together.
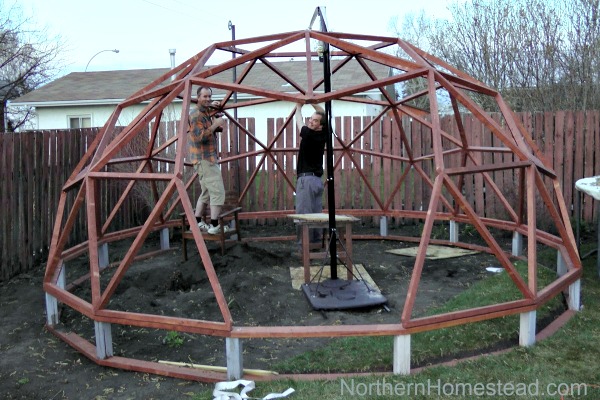
Assemble the GeoDome Greenhouse
First, we built a 1-foot (0.30 m) high pony wall. With a pony wall, you will gain some height, especially for a small dome it can be very important. Some users make a pony wall up to 3 feet (0.91 m) high.
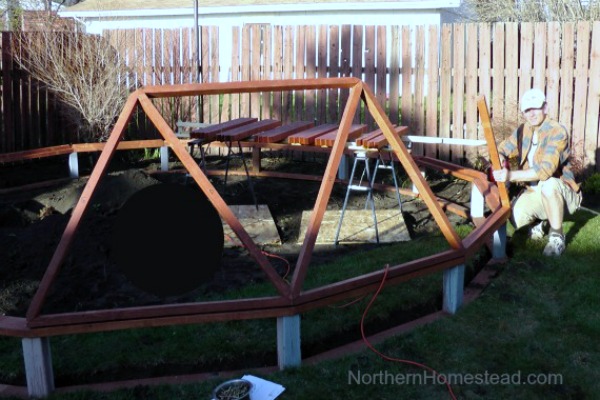
Now we started assembling the dome. It's a bit like playing Lego on a bigger scale, following the plan. The struts are all joined using a miter joint and are held in place by screws as indicated on the graphic below. We recommend to pre-drill all the holes so the wood does not split.
We assembled the top of the dome separately and installed it as one piece. It was a bit heavy and challenging.
Covering the GeoDome Greenhouse
Covering a dome can be tricky because of the shape. Cutting the plastic for 3 facets in a row worked the best. Acidome also calculates nicely the size of the facets, which is especially important for more valuable coverings. With our recycled plastic cover, we simply laid the struts on the plastic and cut the 2-3 facets approximately. Any overlaps we trimmed with a utility knife.
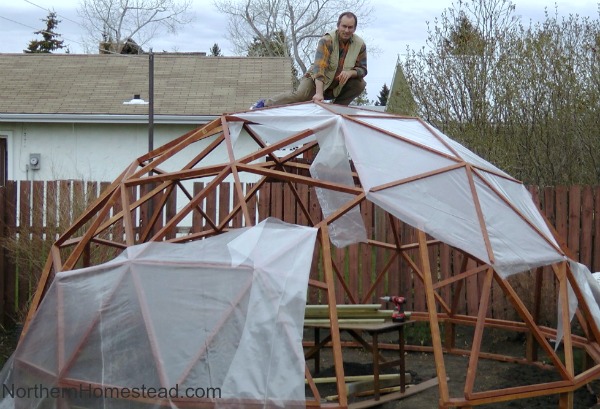
First, we stapled the plastic to the struts and then used the 1 cm planks to hold it in place which also pointed out the structure of the GeoDome even more. We like it :). You can also see in the picture how sturdy the structure is! Read more about covering the GeoDome Greenhouse here.
Door and Windows for the GeoDome greenhouse
We built the door right into a pentagon, as you see in the picture it has two vertical struts as doorposts. We really like it that way. It does not interrupt the shape of the dome, which is perfect especially in winter with all the snow that just slides off the dome. It also allows us access to the dome even with snow still on the ground, and in the summer it gives us an additional opening at the bottom even if we have to close the door because of severe weather which is a bonus, too.
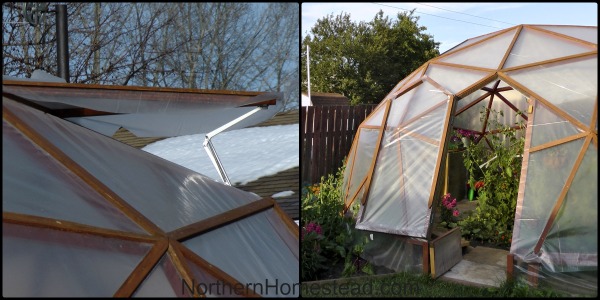
Our dome has two windows, both with an Automatic Greenhouse Window Opener. However, if not using a cooling system, two windows are not enough. We built the door and the windows from the same struts as the structure and covered them with plastic.
This how to build a GeoDome greenhouse comes from our personal experience. We are thrilled that we can inspire so many readers to build their own geodesic dome.
Don't forget to subscribe to Northern Homestead and follow us on Instagram,Facebook, or Pinterest for the latest updates.
More about a GeoDome Greenhouse:
gillisonnevency99.blogspot.com
Source: https://northernhomestead.com/how-to-build-a-geodome-greenhouse/